
Understanding Regional Soil Profiles in the Midwest
Soil preparation techniques are the foundation of productive gardens, farm plots, pastures, and restored landscapes. Whether you are establishing a vegetable garden or restoring a neglected pasture, the physical and chemical condition of your soil determines how well plants can grow. Here is a quick overview of the most important methods used in professional land management:
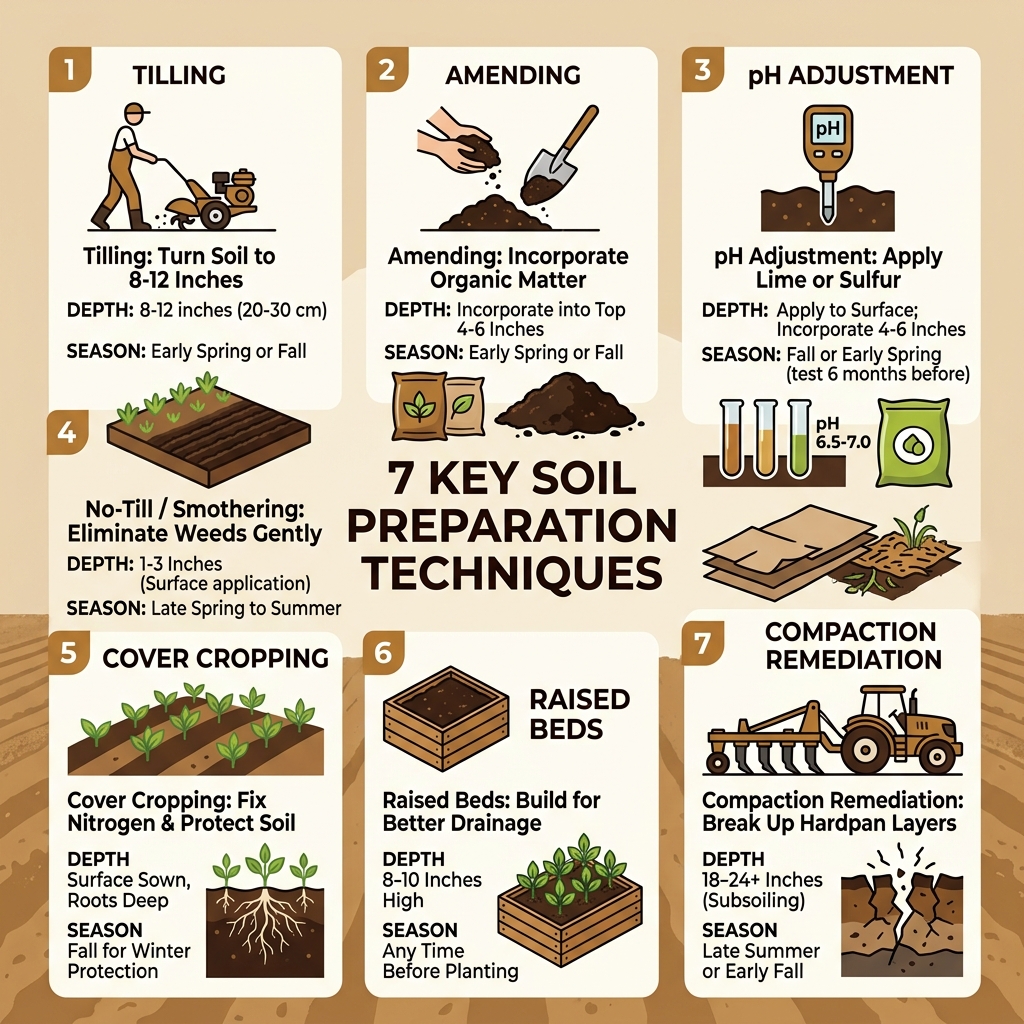
Core Soil Preparation Techniques at a Glance:
- Tilling – Turning the soil to a depth of 8-12 inches to break up surface compaction and incorporate vital organic matter.
- Amending – The strategic addition of compost, leaf mold, or composted manure (typically 30-40 lbs per 100 sq ft) to improve soil structure and long-term fertility.
- pH Adjustment – Utilizing soil tests to apply lime (to raise pH) or elemental sulfur (to lower pH) before the planting season begins.
- No-Till / Smothering – A low-impact method using cardboard, silage tarps, or arborist woodchips to eliminate weeds with minimal soil disturbance.
- Cover Cropping – Planting cereal rye, clover, or vetch to fix nitrogen, prevent erosion, and protect the soil biology over the winter months.
- Raised Beds – Constructing beds 8-10 inches high to ensure superior drainage and rapid root development in areas with high water tables.
- Compaction Remediation – Utilizing heavy-duty subsoiling or professional rotovating to shatter deep hardpan layers that roots and water cannot penetrate.
Most property owners focus first on what they plan to plant: seeds, saplings, turf, or pasture. But the real difference between a thriving, resilient landscape and a struggling one starts below the surface. Soil is far more than just dirt; it is a complex biological engine that stores nutrients, air, water, and organic matter. It supports intricate root systems and feeds the billions of microorganisms that make plants grow. When soil is poorly prepared, even the highest quality seeds will underperform, leading to wasted investment and frustration.
The challenge for those in the Midwest is that soil is rarely uniform. In Lower Michigan and Northern Indiana, property owners deal with a legacy of the Wisconsin Glacial Episode, which left behind everything from heavy glacial clay to sandy loam and compacted fill from past construction. Each of these soil types requires a fundamentally different approach to preparation.
I’m Leon Miller, owner of BrushTamer, a land management company based in Plymouth, Indiana. Since 2021, I’ve helped property owners across Northern Indiana and Lower Michigan apply the right soil preparation techniques to transform neglected, overgrown, or compacted sites into productive ground. In the sections ahead, I’ll walk you through every major method—from mechanical tilling and deep compaction remediation to biological smothering and long-term maintenance—so you know exactly what your land needs to thrive.
Midwest soil preparation begins with identifying the specific geological composition of the land. Professional land management requires a deep understanding of these variations to determine the correct mechanical approach for sites in South Bend, Elkhart, or Valparaiso.
Soil Characteristics in Indiana and Michigan
In our region, you might find heavy, “greasy” clay in one corner of a property in Mishawaka and gravelly, sandy loam just a few hundred yards away.
- Clay Soils: Common across much of Indiana, these soils are fine-textured and naturally fertile but prone to extreme compaction. They drain slowly and can form a hard, impenetrable crust when dry, making it difficult for young seedlings to emerge.
- Sandy Loam: Often found in the glacial outwash plains of Michigan, these soils drain quickly and are easy to work. However, they struggle to hold onto nutrients and moisture, requiring regular organic amendments to maintain productivity.
- Glacial Till: This is a chaotic mix of rocks, sand, silt, and clay deposited by retreating glaciers. It often requires professional land clearing services to remove surface debris and large stones before the soil can even be evaluated for planting.
Understanding these patterns is vital because clay in Valparaiso reacts differently to tilling than the sandy soils of Benton Harbor. For a deeper scientific look, the evaluation of Indiana soils provides a baseline for how these substrates support agriculture and home sites.
Identifying Soil Compaction and Structure
Soil compaction occurs when soil particles are pressed together, reducing the “pore space” that holds air and water. Without these pores, roots cannot undergo respiration, leading to stunted growth, nutrient lockout, or root rot. This is particularly common on sites where heavy machinery was used during home construction or where livestock have grazed for years.
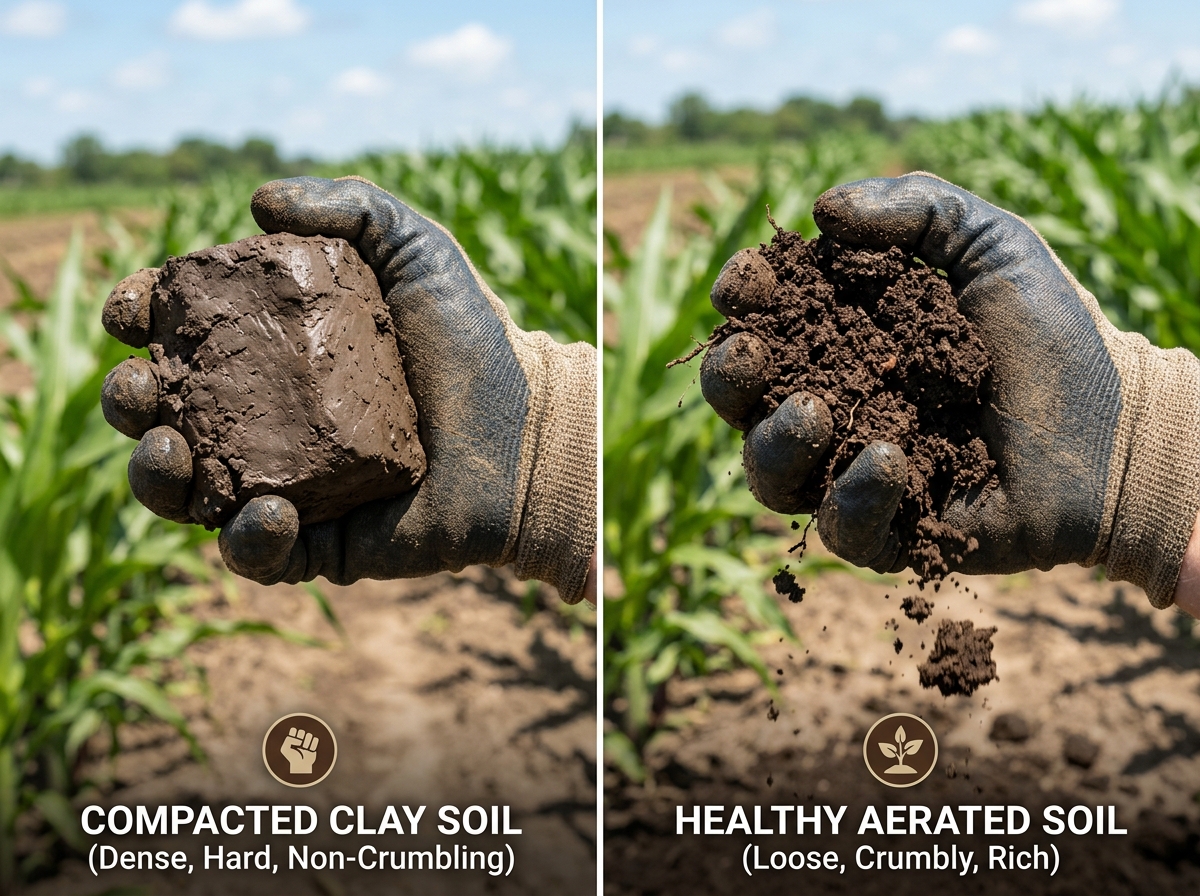
A simple squeeze test can help determine whether the soil is ready for preparation or still too wet to work. Healthy soil should crumble easily when pressed with your thumb, indicating a good balance of sand, silt, and clay. In areas like Portage or Chesterton, the soil is often so compacted that it requires professional intervention to restore healthy soil structure.
Essential Soil Preparation Techniques for Optimal Fertility
Effective soil preparation techniques start with balancing soil chemistry, improving structure, and supporting healthy biological activity. This helps the soil hold nutrients, drain properly, and support stronger roots for gardens, pastures, turf, and ornamental landscapes.
Implementing Soil Preparation Techniques for pH and Nutrient Balance
Before we ever put a plow in the ground, we must understand the chemistry. Most plants thrive in a slightly acidic environment, with a pH between 6.0 and 7.0. If your soil is outside this range, nutrients like phosphorus and nitrogen become chemically “locked” and unavailable to the plant, regardless of how much fertilizer you apply.
- Testing: We always recommend professional lab testing to determine NPK (Nitrogen, Phosphorus, Potassium) levels and micronutrient availability. This prevents the over-application of nutrients which can lead to runoff and environmental damage.
- Adjusting pH: If the soil is too acidic (common in some Michigan woodlots), we apply pelletized lime. If it is too alkaline, elemental sulfur is used to bring the levels down. These adjustments take time to react, which is why we prefer to apply them months before planting.
- Micronutrients: Beyond the big three (NPK), we look for deficiencies in magnesium, calcium, and boron. These act like “vitamins” for your landscape, supporting cellular strength and fruit development.
Detailed soil preparation guides emphasize that fertilizer performs best when soil pH is within the proper range for the intended plants. We ensure the chemical balance is right first to maximize your return on investment.
Organic Matter Amendments and Fertilization Strategies
Organic matter is the engine of soil health. It acts as a biological glue that holds sandy soil together and a wedge that keeps clay soil open. At BrushTamer, we recommend a heavy initial application for new sites to jumpstart the soil food web:
- Manure: Apply 30 to 40 pounds of composted manure for every 100 square feet. It is crucial to use composted manure; fresh manure can rob the soil of nitrogen (a process called “nitrogen robbery”) as it breaks down and can introduce unwanted pathogens or weed seeds.
- Green Manures: These are cover crops like buckwheat or clover that are grown specifically to be turned back into the soil. They provide a slow-release nutrient boost and improve the soil’s tilth.
- Layering: We generally advise against exceeding a 4-inch layer of organic material at once. Over-applying can sometimes create an anaerobic environment that suffocates the existing soil biology.
When converting land for use, our guide to agricultural land conversion details how these amendments transition a wild, unmanaged site into a fertile, productive one.
Mechanical Soil Preparation and Compaction Remediation
Mechanical intervention is often necessary to transform neglected acreage into productive ground. Utilizing heavy-duty equipment allows us to address subsurface issues that manual tools or small garden tillers simply cannot reach.
Advanced Soil Preparation Techniques for Compaction Remediation
Standard garden tillers often skim over hardpan layers common on compacted sites in areas such as Gary or Merrillville. To truly fix the ground, we must address the soil’s bulk density through advanced remediation methods:
- Subsoiling: This involves pulling deep, heavy-duty shanks through the earth to shatter compacted layers 12-18 inches deep. Unlike traditional plowing, subsoiling does not flip the soil, which preserves the existing microbial layers. This unlocks your soil’s potential by allowing water to drain away from the surface and allowing roots to dive deep into the moisture-rich subsoil.
- Vertical Mulching: For sites near established trees in Middlebury or Granger, we use specialized tools to create vertical channels of organic matter. This improves aeration and water infiltration without damaging the critical root flare of the trees.
These subsoiling benefits are essential for long-term land health, especially on sites that have seen heavy vehicle traffic or years of intensive, shallow cultivation.
Tilling, Rotovating, and Low-Disturbance Methods
While “no-till” is a popular buzzword in modern gardening, many sites in Northern Indiana require an initial mechanical “reset” to clear years of neglect and compaction.
- Forestry Tilling: We use high-horsepower equipment to process roots, small stumps, and woody material, helping convert overgrown ground into a more manageable site. This process incorporates a massive amount of organic matter deep into the soil horizon, accelerating the restoration process.
- Rotovating: Unlike a small garden tiller, a professional rotovator treats the soil to a predetermined, uniform depth (usually 10-12 inches). This creates a perfectly level and aerated seedbed, ideal for large-scale vegetable production or turf establishment.
- Depth Matters: We typically work the soil to a depth of 8 to 12 inches. Working it any deeper can sometimes bring up “dead” subsoil that lacks the microbial life and organic matter needed for healthy plant growth.
For properties in Goshen or Nappanee that have been dormant for years, our plow and disc services provide the heavy lifting needed to get the ground ready for the next phase of your project.
Specialized Preparation for Large-Scale Landscapes and Gardens
Different land uses require tailored preparation methods. The deep cultivation needed for vegetable rows is vastly different from the delicate root-flare exposure required for established woodlots or the broad-scale leveling needed for a new pasture.
Preparing Raised Beds and Vegetable Rows
For vegetable production in the Midwest, drainage is often the biggest hurdle. Our heavy spring rains can easily drown young plants in low-lying areas.
- Raised Beds: We often recommend pulling soil into beds 8 to 10 inches high. This keeps roots out of the “wet feet” zone and allows the soil to warm up faster in the spring, extending your growing season.
- Spacing: Conventional rows should be spaced 36 to 40 inches apart. This allows for adequate airflow, which reduces fungal diseases, and provides enough room for maintenance equipment like mowers or small tractors.
- Hugelkultur: This is a centuries-old technique where we bury logs and woody debris under the soil. As the wood decays over several years, it acts as a sponge, holding moisture during droughts and releasing nutrients slowly. It is an excellent way to utilize debris from land clearing.
According to vegetable growing basics from the RHS, the goal is to create a “fine tilth”—soil that is crumbly, aerated, and free of large clods or debris.
Vegetation Elimination and Smothering Techniques
You cannot plant into a field of established weeds and expect success. Before the first seed is sown, the existing vegetation must be eliminated to prevent competition for light and nutrients.
- Silage Tarps: Large, heavy black tarps are laid over the ground for several weeks. The combination of heat and lack of light kills existing weeds and encourages earthworms to move to the surface, naturally aerating the soil.
- Arborist Woodchips: Applying 4-6 inches of woodchips is an excellent way to smother weeds while building soil over time. We often use this in brush management projects in urban areas like South Bend where mechanical tilling might not be feasible.
- Solarization: This involves using clear plastic to trap solar heat, effectively “cooking” weed seeds and soil-borne pathogens in the top few inches of the soil. This is most effective during the peak heat of July and August.
Our 2025 Lot Clearing Guide covers how we integrate these biological methods with mechanical clearing to ensure a clean slate for your project.
Strategic Timing and Long-Term Soil Maintenance
The success of soil preparation is heavily dependent on seasonal timing and moisture levels. In the volatile climates of Northern Indiana and Lower Michigan, working the ground at the wrong time can do more harm than good.
Seasonal Timing and Moisture Management
Timing is everything when it comes to soil structure. If you till clay-heavy soil when it is too wet, you destroy the soil aggregates and create “clods” that turn into hard bricks when they dry.
- The Ball Test: Before we bring equipment onto a site in LaPorte or Michigan City, we perform a simple moisture test. We mold a handful of soil into a ball; if it sticks together like play-dough, it is too wet to work. If it crumbles easily when pressed, the moisture level is ideal for mechanical preparation.
- Fall Plowing: For heavy clay or sites with thick, established sod, we prefer to plow in the fall. The natural “freeze-thaw” cycle of a Midwest winter helps break down the soil clods, leaving a mellow, workable seedbed by the time spring arrives.
- Spring Prep: Once the ground thaws and dries sufficiently, we perform a light secondary cultivation to level the surface and incorporate any final amendments.
Checking the South Bend planting calendar helps us align our mechanical prep with the local frost dates. Understanding the cost to clear and level land also involves factoring in these seasonal windows to ensure the work is done efficiently.
Ongoing Maintenance and Cover Cropping
Soil preparation isn’t a “one-and-done” task; it is a continuous cycle of improvement. Once the initial heavy lifting is done, the focus shifts to maintaining that health.
- Cover Crops: In the off-season, we highly recommend planting cereal rye, oats, or crimson clover. These crops protect the soil from wind and water erosion and “fix” nitrogen, pulling it from the atmosphere and storing it in the roots for next year’s plants.
- Top-Dressing: Instead of tilling every year—which can eventually destroy soil structure and kill beneficial fungi—we suggest an annual top-dressing of 1-2 inches of high-quality compost.
- Avoid Over-Tilling: Constant mechanical disturbance burns up organic matter and disrupts the soil food web. Once the initial compaction is solved, a “low-disturbance” or “no-till” approach is often the best path forward.
When planning land clearing and soil preparation, we consider the long-term maintenance plan so clients receive a healthier, more usable landscape that continues improving over time.
Frequently Asked Questions about Soil Preparation
What is the best way to improve heavy clay soil?
The most effective way to improve heavy clay is a combination of mechanical subsoiling to break deep compaction and the heavy incorporation of organic matter. Adding 2 inches of clean sand and 3 inches of composted leaves or manure can transform the texture over time. However, never add sand to clay without also adding organic matter, as the two can combine to create a concrete-like substance that is nearly impossible to plant in.
How deep should soil be prepared for a new garden?
For most vegetables and ornamentals, you should work the soil to a depth of at least 8 to 12 inches. This provides enough room for a robust root system and ensures that amendments like lime and phosphorus—which do not move easily through the soil profile—reach the active root zone where they are needed most.
When is the ideal time to begin soil preparation in the Midwest?
Ideally, preparation begins in the fall. This allows time for amendments to break down and for the soil to settle naturally over the winter. However, if you are starting in the spring, wait until the soil passes the “ball test” for moisture to avoid causing long-term compaction issues that can take years to reverse.
Can I prepare soil without a tiller?
Yes, for smaller areas, you can use “no-dig” methods such as sheet mulching (layering cardboard and compost) or using silage tarps to kill off existing vegetation. These methods take longer—often several months—but they are excellent for preserving soil biology and preventing the germination of dormant weed seeds.
Conclusion
At BrushTamer, we believe that your land is an investment that deserves a solid foundation. Since our founding in 2021, we have dedicated ourselves to providing professional land management services that respect the unique ecology of the Midwest. Whether your property is in Northern Indiana, Lower Michigan, or another part of BrushTamer’s Midwest service area, our team has the equipment and expertise to handle demanding soil preparation techniques.
From forestry mulching to deep subsoiling and site leveling, we take the guesswork out of land management. Don’t settle for “good enough” dirt when you can have thriving, productive soil that supports your vision for years to come.
Ready to transform your property? Contact BrushTamer today and see how we can help you start your next project on the right foot.